| Promo Code | Description |
|---|---|
| scott295 | SPECIAL OFFER! .COMs just $2.95* per year up to 3 domains! Additional .COMs just $7.99* per year! (offer expires February 1, 2013). |
| 499ssl5 | $4.99 SSL certificates for multiple years. Codes saves $7 the first year, $65 a year for each year after that. (offer expires January 1, 2013). |
| 599scott | $5.99 domains, per year up to 3 domains. Additional .COMs just $7.99* per year! (offer expires July 1, 2013). |
| go20off8 | Save 20% off your entire order with the this code. (offer expires Dec. 1, 2013). |
| SCOTTDEAL | 10% off any order |
| SCOTT30 | $5 off $30 or more |
| SCOTTCOM | $7.99 .com |
| SCOTT75 | 15% off $75 or more |
| SCOTT40 | $10 off $40 or more |
| SCOTTHOST | 20% off 1, 2, or 3 year hosting plans |
| SCOTT799 | $7.99 on .NET, .BIZ or .ORG domains |
| SCOTT1299 | $12.99 SSL (first year only) |
| NON-EXPIRING GODADDY COUPON CODES | |
| promo10 | Save 10% off your entire order |
| promo15 | Save 15% on your order of $75 or more |
| promo530 | Save $5 off any order of $30 or more |
| promo749 | Save 50% on .com registrations, transfers and renewals |
| promossl | $12.99 standard SSL certificates (normally $69.95) |
Browse » Home »
Posts filed under Tricks And Tutorials
Special Domain offer Godaddy promo code
How To Troubleshoot Your System For Memory Problems In Windows 7
W
indows 7 includes built-in features to help you identify and diagnose problems with memory.If you suspect a computer has a memory problem that isn't being automatically detected, you can run the Windows Memory Diagnostics utility by completing the following steps:
- Click Start, type mdsched.exe in the Search box, and then press Enter
- Choose whether to restart the computer and run the tool immediately or schedule the tool to run at the next restart.
When testing is completed, the computer restarts automatically. You’ll see the test results when you log on.
Note that if a computer crashes because of failing memory, and Windows Memory Diagnostics detects this, the system will prompt you to schedule a memory test the next time the computer is restarted.
How to set new password without confirm password
I
changed my Laptop("Sleepy Angel")'s password 48 hours ago after that i worked for 48 hours and my sleepy angel continuously wake up with me and i forgot password because that password i used first time so its happen. Now problem is that i want to set my old password without confirmation of password. I got its solution.How to set new password without confirm password
- Go to Run type lusrmgr.msc [Logon User Manager Microsoft Console] Hit Enter.
- Now you will see this below window click on left side Users folder
- Right click on user account name my account name is administrator and click on set password
- After set password click on proceed.
- Now set your password with out confirmation of old password
Joomla!® Open Source Matters.
J
oomla!® is a free, award-winning content management system written in PHP which is allows users to easily publish their content on the world wide web and intranets. Joomla is created as an open-source project where individuals and teams contribute their skills to its development as well as its supporting systems.While Joomla is packed with features, its greatest quality is that it is extremely extensible. Because of its extensible structure, there aren't many things you cannot do with Joomla!. A short list of some important features of Joomla! are the following:
- Page Caching
- Web Indexing
- RSS Feeds
- Printable Page Versions
- Newsflashes
- Blogs
- Forums
- Polls
- Calendars
- Website Searching
- Language Internationalisation.
Some Useful Sites for Joomla
Project Site : http://www.joomla.org
Demo Site : http://demo.joomla.org
End-User Documentation : http://help.joomla.org
Developer Network : http://dev.joomla.org
Extension Directory : http://extensions.joomla.org
Joomla is released under the GNU General Public License.
Demo Site : http://demo.joomla.org
End-User Documentation : http://help.joomla.org
Developer Network : http://dev.joomla.org
Extension Directory : http://extensions.joomla.org
Joomla is released under the GNU General Public License.
What's in a name?
The name Joomla! is a phonetic spelling for the Swahili word "Jumla", which means "all together" or "as a whole". It was chosen as the entire team behind Mambo was unanimous in their commitment to protecting the interests of the project and community.
This name was chosen from thousands of recommendations by the community, and even went through an arduous review session by branding and marketing professionals who also felt that Joomla! was the best choice of the lot.
What sets Joomla! apart from the rest is our dedication to keeping things as simple as possible while providing the most features possible. Finally, non-technical people can have complete control over their websites without paying exorbitant amounts for closed, proprietary software.
Joomla! is more than just software, it is people. The community behind Joomla! includes developers, designers, systems administrators, translators, content writers, and most importantly the end users. We welcome you to our community, and look forward to the future with great excitement!
Create PDF from over 300 file formats
I
posted a posts about PDF file create form other formats these post are Web Page Convert To PDF, File to PDFToday I got something amazing create pdf from 300 file formats
PDF Converter Elite was developed with the business user in mind. Create, convert and edit any type of PDF with ease and for a fraction of a cost of Adobe Acrobat. FreePDF Creator is a fast desktop tool to create PDFs from virtually any printable Windows format.
The Free and Fast PDF Creator
FreePDF Creator Features
- Create PDF from any printable Windows format - over 300 different file types at last count
- Unlimited use, no time limit
- Developed with Microsoft Office Formats in mind. Create PDF from Microsoft Word, Excel and PowerPoint easily and accurately
- Supports Asian language fonts
System Requirements
| Operating System: | Windows® 98, ME®, Windows NT®, 4.0, 2000, XP®, Windows Vista®, Windows 7® |
| Additional Software: | Microsoft Office® 2000, 2002/XP, 2003, 2007 or 2010 |
| Processor: | Pentium® processor, or equivalent |
| Hard Drive Space: | 12MB of available hard-disk space |
| Memory: | 64MB RAM |
| Monitor: | VGA 16 color 640x480 screen resolution |
Mastering The Windows XP Registry
The Recovery Console
T
he Windows XP Recovery Console is a tool that allows recovery from a number of failures.
Previously, all you could do was boot another copy of Windows XP and hack your way around,replacing files, even registry components, in the blind hope that you would somehow fix the problem. With Windows XP, you have two tools to use: the Recovery Console and the Safe Mode feature.The Recovery Console is a powerful, simple (no, that's not an oxymoron!) feature that is supplied with Windows XP, but it is not installed by default. The Windows XP Safe Mode works in the same manner as the Safe Mode found in other versions of Windows. You can modify a number of system settings using Safe Mode (such as video modes). Installing the Recovery Console after the system has failed is quite like locking the barn door after the horse has been stolen—it really won't work that well.
Installing the Recovery Console
The Recovery Console must be installed before disaster strikes. It will be difficult (maybe even impossible) to install it after a disaster has reared its ugly head. So, let's install the Recovery Console right now. First, you must use the Windows XP distribution CD (or share containing the appropriate files, if installing from a network device). The Recovery Console is installed using the winnt32.exe program. The winnt32.exe program is the same program that is used to install Windows XP; however, by selecting the correct option, you are able to tell winnt32.exe to not install Windows XP, but to install the Recovery Console instead. Note It is not possible to install the Recovery Console at the same time as Windows XP. You must first install Windows XP, then install the Recovery Console. If you have multiple copies of Windows XP installed, it is only necessary to install the Recovery Console one time—the Recovery Console will work with as many copies of Windows XP as are installed.
Follow these steps to install the Recovery Console from the Windows XP distribution CD:
- Insert the distribution CD and change into the i386 directory.
- Run winnt32.exe using the /cmdcons option. Typically, no other options are needed, though some users may wish to specify source options, especially if installing from a network share rather than a hard drive.
- The installation program contacts Microsoft to check for updates to this Windows XP component.
- The winnt32.exe program opens the dialog box shown. This dialog box allows you to cancel the installation if you need to. Note that multiple installations of the Recovery Console will simply overwrite previous installations; in such cases, no error is generated.
- If there are no errors, the dialog box shown in Figure 2.5 is displayed. The Recovery Console is ready for use at this point.
What's in the Recovery Console?
The Recovery Console consists of a minor modification to the boot.ini file, and the addition of a hidden directory on the boot drive. The added directory's name is cmdcons. The change to the boot.ini file is simply the addition of another line providing for a new boot option:
C:\cmdcons\bootsect.dat="Microsoft Windows Recovery console" /cmdcons
This option consists of a fully qualified file name (C:\cmdcons\bootsect.dat), a text description (Microsoft Windows Recovery Console), and a boot option (/cmdcons). As everyone should be well aware, the Windows XP Boot Manager is able to boot virtually any operating system (assuming that the operating system is compatible with the currently installed file system).
How Windows XP Supports Booting other Operating Systems
Windows XP can be told to "boot" any directory or file location. For example, the Recovery Console is saved in the cmdcons directory. In the cmdcons directory is a 512-byte file named bootsect.dat. Windows XP will treat a file named bootsect.dat exactly as if it were a hard disk's boot sector. In fact, one could, theoretically, copy the bootsect.dat file to a drive's boot sector location and cause that operating system to be booted directly. One use for this technology is in a multiple-boot configuration where the other operating system or systems are not compatible with Windows NT (such as Windows 95/98/Me). The Recovery Console does qualify as an operating system, though it is very simple—and limited. A major question will always be this: is the Recovery Console secure? In most situations, the Recovery Console is actually quite secure. The user, at startup of the Recovery Console, is prompted for two pieces of information:
- Which Windows XP installation is to be repaired (assuming that there is more than one Windows XP installation!).
- The Administrator's password for that installation. The Recovery Console then uses the installation's SAM to validate this password to ensure the user has the necessary permission to use the system.
All about FTP must read
Setting Up A FTP
S
ince many of us have always wondered this, here it is. Long and drawn out. Also, before attempting this, realize one thing; You will have to give up your time, effort, bandwidth, and security to have a quality ftp server.That being said, here it goes. First of all, find out if your IP (Internet Protocol) is static (not changing) or dynamic (changes everytime you log on). To do this, first consider the fact if you have a dial up modem. If you do, chances are about 999 999 out of 1 000 000 that your IP is dynamic. To make it static, just go to a place like h*tp://www.myftp.org/ to register for a static ip address.
You'll then need to get your IP. This can be done by doing this:
Going to Start -> Run -> winipcfg or www.ask.com and asking 'What is my IP?'
After doing so, you'll need to download an FTP server client. Personally, I'd recommend G6 FTP Server, Serv-U FTPor Bullitproof v2.15 all three of which are extremely reliable, and the norm of the ftp world.
You can download them on this site: h*tp://www.liaokai.com/softw_en/d_index.htm
First, you'll have to set up your ftp. For this guide, I will use step-by-step instructions for G6. First, you'll have to go into 'Setup -> General'. From here, type in your port # (default is 21). I recommend something unique, or something a bit larger (ex: 3069). If you want to, check the number of max users (this sets the amount of simultaneous maximum users on your server at once performing actions - The more on at once, the slower the connection and vice versa).
The below options are then chooseable:
- Launch with windows
- Activate FTP Server on Start-up
- Put into tray on startup
- Allow multiple instances
- Show "Loading..." status at startup
- Scan drive(s) at startup
- Confirm exit
You can do what you want with these, as they are pretty self explanatory. The scan drive feature is nice, as is the 2nd and the last option. From here, click the 'options' text on the left column.
To protect your server, you should check 'login check' and 'password check', 'Show relative path (a must!)', and any other options you feel you'll need. After doing so, click the 'advanced' text in the left column. You should then leave the buffer size on the default (unless of course you know what you're doing ), and then allow the type of ftp you want.
Uploading and downloading is usually good, but it's up to you if you want to allow uploads and/or downloads. For the server priority, that will determine how much conventional memory will be used and how much 'effort' will go into making your server run smoothly.
Anti-hammering is also good, as it prevents people from slowing down your speed. From here, click 'Log Options' from the left column. If you would like to see and record every single command and clutter up your screen, leave the defaults.
But, if you would like to see what is going on with the lowest possible space taken, click 'Screen' in the top column. You should then check off 'Log successful logins', and all of the options in the client directry, except 'Log directory changes'. After doing so, click 'Ok' in the bottom left corner.
You will then have to go into 'Setup -> User Accounts' (or ctrl & u). From here, you should click on the right most column, and right click. Choose 'Add', and choose the username(s) you would like people to have access to.
After giving a name (ex: themoonlanding), you will have to give them a set password in the bottom column (ex: wasfaked). For the 'Home IP' directory, (if you registered with a static server, check 'All IP Homes'. If your IP is static by default, choose your IP from the list. You will then have to right click in the very center column, and choose 'Add'.
From here, you will have to set the directory you want the people to have access to. After choosing the directory, I suggest you choose the options 'Read', 'List', and 'Subdirs', unless of course you know what you're doing . After doing so, make an 'upload' folder in the directory, and choose to 'add' this folder seperately to the center column. Choose 'write', 'append', 'make', 'list', and 'subdirs'. This will allow them to upload only to specific folders (your upload folder).
Now click on 'Miscellaneous' from the left column. Choose 'enable account', your time-out (how long it takes for people to remain idle before you automatically kick them off), the maximum number of users for this name, the maximum number of connections allowed simultaneously for one ip address, show relative path (a must!), and any other things at the bottom you'd like to have. Now click 'Ok'.
**Requested**
From this main menu, click the little boxing glove icon in the top corner, and right click and unchoose the hit-o-meter for both uploads and downloads (with this you can monitor IP activity). Now click the lightning bolt, and your server is now up and running.
Post your ftp info, like this:
213.10.93.141 (or something else, such as: 'f*p://example.getmyip.com')
User: *** (The username of the client)
Pass: *** (The password)
Port: *** (The port number you chose)
So make a FTP and join the FTP section
Listing The Contents Of A Ftp:
Listing the content of a FTP is very simple.
You will need FTP Content Maker, which can be downloaded from here:
http://www.etplanet.com/
1. Put in the IP of the server. Do not put "ftp://" or a "/" because it will not work if you do so.
2. Put in the port. If the port is the default number, 21, you do not have to enter it.
3. Put in the username and password in the appropriate fields. If the login is anonymous, you do not have to enter it.
4. If you want to list a specific directory of the FTP, place it in the directory field. Otherwise, do not enter anything in the directory field.
5. Click "Take the List!"
6. After the list has been taken, click the UBB output tab, and copy and paste to wherever you want it.
If FTP Content Maker is not working, it is probably because the server does not utilize Serv-U Software.
If you get this error message:
StatusCode = 550
LastResponse was : 'Unable to open local file test-ftp'
Error = 550 (Unable to open local file test-ftp)
Error = Unable to open local file test-ftp = 550
Close and restart FTP Content Maker, then try again.
error messages:
110 Restart marker reply. In this case, the text is exact and not left to the particular implementation; it must read: MARK yyyy = mmmm Where yyyy is User-process data stream marker, and mmmm server's equivalent marker (note the spaces between markers and "=").
120 Service ready in nnn minutes.
125 Data connection already open; transfer starting.
150 File status okay; about to open data connection.
200 Command okay.
202 Command not implemented, superfluous at this site.
211 System status, or system help reply.
212 Directory status.
213 File status.
214 Help message. On how to use the server or the meaning of a particular non-standard command. This reply is useful only to the human user.
215 NAME system type. Where NAME is an official system name from the list in the Assigned Numbers document.
220 Service ready for new user.
221 Service closing control connection. Logged out if appropriate.
225 Data connection open; no transfer in progress.
226 Closing data connection. Requested file action successful (for example, file transfer or file abort).
227 Entering Passive Mode (h1,h2,h3,h4,p1,p2).
230 User logged in, proceed.
250 Requested file action okay, completed.
257 "PATHNAME" created.
331 User name okay, need password.
332 Need account for login.
350 Requested file action pending further information.
421 Too many users logged to the same account
425 Can't open data connection.
426 Connection closed; transfer aborted.
450 Requested file action not taken. File unavailable (e.g., file busy).
451 Requested action aborted: local error in processing.
452 Requested action not taken. Insufficient storage space in system.
500 Syntax error, command unrecognized. This may include errors such as command line too long.
501 Syntax error in parameters or arguments.
502 Command not implemented.
503 Bad sequence of commands.
504 Command not implemented for that parameter.
530 Not logged in.
532 Need account for storing files.
550 Requested action not taken. File unavailable (e.g., file not found, no access).
551 Requested action aborted: page type unknown.
552 Requested file action aborted. Exceeded storage allocation (for current directory or dataset).
553 Requested action not taken. File name not allowed.
Active FTP vs. Passive FTP, a Definitive Explanation
- Introduction
This may not be the definitive explanation, as the title claims, however, I've heard enough good feedback and seen this document linked in enough places to know that quite a few people have found it to be useful. I am always looking for ways to improve things though, and if you find something that is not quite clear or needs more explanation, please let me know! Recent additions to this document include the examples of both active and passive command line FTP sessions. These session examples should help make things a bit clearer. They also provide a nice picture into what goes on behind the scenes during an FTP session. Now, on to the information...
- The Basics
- Active FTP
From the server-side firewall's standpoint, to support active mode FTP the following communication channels need to be opened:
FTP server's port 21 from anywhere (Client initiates connection)
FTP server's port 21 to ports > 1024 (Server responds to client's control port)
FTP server's port 20 to ports > 1024 (Server initiates data connection to client's data port)
FTP server's port 20 from ports > 1024 (Client sends ACKs to server's data port)
In step 1, the client's command port contacts the server's command port and sends the command PORT 1027. The server then sends an ACK back to the client's command port in step 2. In step 3 the server initiates a connection on its local data port to the data port the client specified earlier. Finally, the client sends an ACK back as shown in step 4.
The main problem with active mode FTP actually falls on the client side. The FTP client doesn't make the actual connection to the data port of the server--it simply tells the server what port it is listening on and the server connects back to the specified port on the client. From the client side firewall this appears to be an outside system initiating a connection to an internal client--something that is usually blocked.
- Active FTP Example
Below is an actual example of an active FTP session. The only things that have been changed are the server names, IP addresses, and user names. In this example an FTP session is initiated from testbox1.slacksite.com (192.168.150.80), a linux box running the standard FTP command line client, to testbox2.slacksite.com (192.168.150.90), a linux box running ProFTPd 1.2.2RC2. The debugging (-d) flag is used with the FTP client to show what is going on behind the scenes. Everything in red is the debugging output which shows the actual FTP commands being sent to the server and the responses generated from those commands. Normal server output is shown in black, and user input is in bold.
There are a few interesting things to consider about this dialog. Notice that when the PORT command is issued, it specifies a port on the client (192.168.150.80) system, rather than the server. We will see the opposite behavior when we use passive FTP. While we are on the subject, a quick note about the format of the PORT command. As you can see in the example below it is formatted as a series of six numbers separated by commas. The first four octets are the IP address while the second two octets comprise the port that will be used for the data connection. To find the actual port multiply the fifth octet by 256 and then add the sixth octet to the total. Thus in the example below the port number is ( (14*256) + 178), or 3762. A quick check with netstat should confirm this information.
testbox1: {/home/p-t/slacker/public_html} % ftp -d testbox2
Connected to testbox2.slacksite.com.
220 testbox2.slacksite.com FTP server ready.
Name (testbox2:slacker): slacker
---> USER slacker
331 Password required for slacker.
Password: TmpPass
---> PASS XXXX
230 User slacker logged in.
---> SYST
215 UNIX Type: L8
Remote system type is UNIX.
Using binary mode to transfer files.
ftp> ls
ftp: setsockopt (ignored): Permission denied
---> PORT 192,168,150,80,14,178
200 PORT command successful.
---> LIST
150 Opening ASCII mode data connection for file list.
drwx------ 3 slacker users 104 Jul 27 01:45 public_html
226 Transfer complete.
ftp> quit
---> QUIT
221 Goodbye.
- Passive FTP
In order to resolve the issue of the server initiating the connection to the client a different method for FTP connections was developed. This was known as passive mode, or PASV, after the command used by the client to tell the server it is in passive mode.
In passive mode FTP the client initiates both connections to the server, solving the problem of firewalls filtering the incoming data port connection to the client from the server. When opening an FTP connection, the client opens two random unprivileged ports locally (N > 1024 and N+1). The first port contacts the server on port 21, but instead of then issuing a PORT command and allowing the server to connect back to its data port, the client will issue the PASV command. The result of this is that the server then opens a random unprivileged port (P > 1024) and sends the PORT P command back to the client. The client then initiates the connection from port N+1 to port P on the server to transfer data.
From the server-side firewall's standpoint, to support passive mode FTP the following communication channels need to be opened:
FTP server's port 21 from anywhere (Client initiates connection)
FTP server's port 21 to ports > 1024 (Server responds to client's control port)
FTP server's ports > 1024 from anywhere (Client initiates data connection to random port specified by server)
FTP server's ports > 1024 to remote ports > 1024 (Server sends ACKs (and data) to client's data port)
In step 1, the client contacts the server on the command port and issues the PASV command. The server then replies in step 2 with PORT 2024, telling the client which port it is listening to for the data connection. In step 3 the client then initiates the data connection from its data port to the specified server data port. Finally, the server sends back an ACK in step 4 to the client's data port.
While passive mode FTP solves many of the problems from the client side, it opens up a whole range of problems on the server side. The biggest issue is the need to allow any remote connection to high numbered ports on the server. Fortunately, many FTP daemons, including the popular WU-FTPD allow the administrator to specify a range of ports which the FTP server will use. See Appendix 1 for more information.
The second issue involves supporting and troubleshooting clients which do (or do not) support passive mode. As an example, the command line FTP utility provided with Solaris does not support passive mode, necessitating a third-party FTP client, such as ncftp.
With the massive popularity of the World Wide Web, many people prefer to use their web browser as an FTP client. Most browsers only support passive mode when accessing ftp:// URLs. This can either be good or bad depending on what the servers and firewalls are configured to support.
- Passive FTP Example
Below is an actual example of a passive FTP session. The only things that have been changed are the server names, IP addresses, and user names. In this example an FTP session is initiated from testbox1.slacksite.com (192.168.150.80), a linux box running the standard FTP command line client, to testbox2.slacksite.com (192.168.150.90), a linux box running ProFTPd 1.2.2RC2. The debugging (-d) flag is used with the FTP client to show what is going on behind the scenes. Everything in red is the debugging output which shows the actual FTP commands being sent to the server and the responses generated from those commands. Normal server output is shown in black, and user input is in bold.
Notice the difference in the PORT command in this example as opposed to the active FTP example. Here, we see a port being opened on the server (192.168.150.90) system, rather than the client. See the discussion about the format of the PORT command above, in the Active FTP Example section.
testbox1: {/home/p-t/slacker/public_html} % ftp -d testbox2
Connected to testbox2.slacksite.com.
220 testbox2.slacksite.com FTP server ready.
Name (testbox2:slacker): slacker
---> USER slacker
331 Password required for slacker.
Password: TmpPass
---> PASS XXXX
230 User slacker logged in.
---> SYST
215 UNIX Type: L8
Remote system type is UNIX.
Using binary mode to transfer files.
ftp> passive
Passive mode on.
ftp> ls
ftp: setsockopt (ignored): Permission denied
---> PASV
227 Entering Passive Mode (192,168,150,90,195,149).
---> LIST
150 Opening ASCII mode data connection for file list
drwx------ 3 slacker users 104 Jul 27 01:45 public_html
226 Transfer complete.
ftp> quit
---> QUIT
221 Goodbye.
Summary
The following chart should help admins remember how each FTP mode works:
Active FTP :
command : client >1024 -> server 21
data : client >1024 <- server 20
Passive FTP :
command : client >1024 -> server 21
data : client >1024 -> server >1024
A quick summary of the pros and cons of active vs. passive FTP is also in order:
Active FTP is beneficial to the FTP server admin, but detrimental to the client side admin. The FTP server attempts to make connections to random high ports on the client, which would almost certainly be blocked by a firewall on the client side. Passive FTP is beneficial to the client, but detrimental to the FTP server admin. The client will make both connections to the server, but one of them will be to a random high port, which would almost certainly be blocked by a firewall on the server side.
Luckily, there is somewhat of a compromise. Since admins running FTP servers will need to make their servers accessible to the greatest number of clients, they will almost certainly need to support passive FTP. The exposure of high level ports on the server can be minimized by specifying a limited port range for the FTP server to use. Thus, everything except for this range of ports can be firewalled on the server side. While this doesn't eliminate all risk to the server, it decreases it tremendously.
Apple releases Flashback malware removal tool
A
pple has released an automated removal tool to help users remove the flashback mal ware discovered by Dr. Web in April. It had infected an estimated half a million computers worldwide within a couple of weeks.
The Flashback malware is a Trojan that has been designed to exploit vulnerability in java, allowing it to steal user information through the web browser and other applications, and flash it back to remote servers. It has many variants, some that mask themselves as Adobe Flash video and other browser plug-ins that users mistakenly agree to install without direct user interaction.
Other companies released their own removal tools for the virus, starting with Kaspersky and F-Secure, and then Symantec, a little ahead of Apple- which had announced it would be developing one, two days prior to Symantec's tool release. Apple's tool will be part of a security update to Java. The fruity giant says the Flashback removal tool will get at the "the most common variants" of the malware, and also block automatic webpage Java applet execution.
The Apple Flashback removal tool is only available for systems running OS X IO.6 or later, and will be bundled with the latest Java runtime, that also contains its own patches. The tool will install MRTAgent and a command line tool, which scour and find any Flashback malware instances, submit a log to Apple and then delete themselves. While all currently known Flashback variants should be successfully removed by the Apple tool, it will require regular updates to work effectively. Apple will also be working with internet service providers to try and disable access to the remote servers that the Trojan malware is coordinating with. Experts are predicting the time of “no malware for Mac” is at an end, with the bad guys or malware authors turning their sights to platform, deftly using their experience with the Windows and Linux malware. You can download the removal tools with Java for OS X Lion 2012-003 or Java for Mac OS X 10.6 Update 8 packages.
Using XAMPP (Apache-MySQL-PHP-Perl) for Windows
M
any people know from their own experience that it's not easy to install an Apache web server and it gets harder if you want to add MySQL, PHP and Perl. XAMPP is an easy to install Apache distribution containing MySQL, PHP and Perl. XAMPP is really very easy to install and to use just download, extract, and start.
HOW TO INSTALL XAMPP.....
After the installation is complete, you will find XAMPP under Start | Programs | XAMPP. You can use the XAMPP Control Panel to start/stop all server and also install/uninstall services.
The XAMPP control panel for start/stop Apache, MySQL, FilaZilla & Mercury or install these server as services.
Video Tutorial
Connect your Sky Drive using the new app
Easily sync files to your SkyDrive account using the free tool.
S
ky Drive has certain limitations when accessing your online storage over the web interface or while connecting as a network drive in Windows Explorer. These limitations should now change with he new SkyDrive App offered by Microsoft for PCs and other platforms. Login through your existing SkyDrive account and follow the link 'Get SkyDrive Apps'. At first, you will find the button 'Get Apps' under 'SkyDrive for Windows' and then click on the 'Download' button. One should also follow the link 'Manage storage' in SkyDrive. This service offers new registrations 7 GB of free space. Once you have downloaded the SkyDrive app, enter your SkyDrive credentials when starting the app for the first time. Now, you can access SkyDrive through Windows Explorer.Your phone just went for a swim !!!!!!

W
hat happens when a smartphone falls in water? Ideally, nothing if you are quick enough to fish it out and thoroughly shake the water out, there's a good chance it will survive the mishap without any problem what so ever.Your phone just went for a swim? No need to panic. just follow these steps to rescue your smartphone, smartly
This is How it works
- DRY First dry the cell phone's outer body, and try to shake out the water inside by flicking it in one direction; that helps shake out most of the moisture. But water may also reside in the corners of the device, and shaking may not get it out completely.

- REMOVE BATTERY You should also remove the battery immediatly. By doing this, you're effectively cutting off all power and preventing any short circuits if the water is conducting electricity in the cell phone. So, remove the cover of device, remove the battery and place the individual parts on cloth.

- DISMANTLE If you feel up to it, dismantle the cell phone s much as possible. Take apart everything that can be removed without causing damage to the device. You can use a screwdriver to do this. Wherever you can see moisture, dad it immediatly and carefully with a cloth. Every now and then, shake the open devbice.
- SUCK THE CELL PHONE DRY Why not use a blower to blow the water out of the phone? But then I remembered blown compressed air drives moisture deeper into the device. It is more practical to suck the cell phone dry with a vacuum cleaner.
- ABSORB THE MOISTURE Another trick is to place the cell phone parts overnight in a bowl full of uncoocked rice and cover it - Tupperware containers are well suitedd for this. The dry rice will absorb the moisture from the phone. It is importnt to have the cover on the bowl or the rice will absorb moisture from the environment too, not just from the cell phone.

- CLEAN THE DISPLAY If you can still see moisture present in the device, mainly in the display, you cab clean these areas with isopropyl alcohol. In our case, we first dislodged the display a bit by attaching a piece of paper. Then we let the alcohol run through. Don't be too worried as fluid has three main advantages: the water driven out, it doesn't conduct electricity, and it evaporates quickly.
How to Change XP Boot Screen..?
I
f you would like to change your boot up screen follow the directions below. These instructions assume that you have a place to download the boot screen from the net.
If you would like to download a boot screen, visit http://www.themexp.org
How To Change BootUp Screen in Windows XP
- Backup (copy) the file %windir%\system32\ntoskrnl.exe (most likely C:\windows\system32\ntoskrnl.exe - the boot screen)
- Download the .zip to your computer
- Extract ntoskrnl.exe to a directory other than %windir%\system32 (most likely C:\windows\system32)
- Reboot your computer into Safe Mode (hit F8 before the boot screen) or into true DOS (from a boot disk
- Overwrite the file %windir%\system32\ntoskrnl.exe (which should have been backed up) with the extracted exe
- Reboot your computer as you normally would
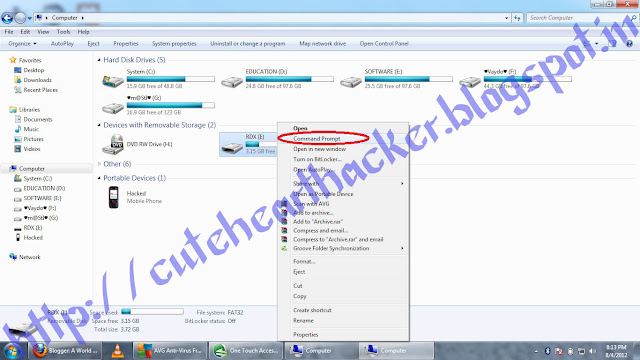
How to add Commnad Prompt in right click..??
H
i Friends,Today, I am going to do somthing new i hope you all like it.
when we use command prompt that time we go in directory using "cd" and "cd.." commands but i have one easy way to access directory. just imagine if any Operating System provide Command prompt menu is it possible noooo???? but i say Yupssss Why Not friends..??

Now we can add command prompt in right click of any directory folder or drive by this tutorial post
How to add Command Prompt in right click
- Start > Run
- Enter "regedit" and hit Enter
- Expand to "HKEY_LOCAL_MACHINE\SOFTWARE\Classes\Folder\shell"
- Right-click on "shell" and select New > Key
- Make sure a new key is created under "shell". Change the name of this key to "Command Prompt"
- Right-click on this new key "Command Prompt" and select New > Key
- Change the name of this key to "command"
Yuppieee It's Done!!!!!!!!!
For Video tutorial Find us on YouTube
https://www.youtube.com/user/thehackerofheart
How to enter in Windows Xp without Password ??

T
here is a way to log 0n to your Windows XP system if ever you've forgotten all your users account passwords and don't have any administrator account to enter the system. The truth is you don't need to install expensive 3rd party software or don't even need to be an expert to enter your locked XP system. What you just need is your Windows XP installer disc and your locked system to have an optical drive (of course). This is very handy if you forgot your administrator password and don't have any access to other account with administrator rights or if you're friend have also forgot his password.
Here's what you'll do if ever you forgot all your User Account'spassword and you thought (including Microsoft) that you can no longer enter your System.
How to enter in Windows Xp without Password
- Put the Windows XP installer disc into the optical drive (CD/DVD) and restart your PC.
- Press any key when prompted with "Press any key to boot from CD", then wait for the "Welcome to setup" screen to appear, just press enter.
- Then press F8 to agree on the license agreement.
- On the next screen, you will be prompted to repair or install a fresh copy of Windows XP. You just need to select the locked Windows XP installation you want to enter (If you've more than one Windows XP installed) and press "R".
- The system will then reboot after setup checked the disk and copied setup files (Just wait for the system to reboot). And when it reboots, don't press any key when prompted to "Press any key to boot from CD".
- The setup will be automatically start the setup process. This is the most important steps, you need to wait for the setup to install the devices. Press the combination of SHIFT+F10 when you see the words "Installing Devices" at the bottom of the shown remaining minutes of the setup to finish.
- After that, a command console will be open, where in you need to type "NUSRMGR.CPL" (Without the quotes).
- You will be then given access to the User Account window similar to the control panel where you will delete or edit your forgotten password. Choose remove if you need to enter the system without entering password or edit if you want to change your forgotten password.
- After you delete or edit your account password, close the command windows and let the setup to finish. (You will also be needing to enter the XP product key if prompted)
- When setup is finished, system will reboot and you'll be automatically enter your system if you choose to delete the password or need to enter your new password if you just edit your forgotten password.
- That's all! You now have entered your locked Windows XP system.
How to Get More Like for Facebook fan Page !!!!!

T
here are over three million active facebook pages, and these pages are gaining millions of new fans every day.Although the button has changed from “Become a fan” to “Like,” the action of joining a brands page remains the same. Facebook pages are still fan pages.
With Facebook’s announcement of The New Messaging there are more reasons to like Facebook, and Facebook pages, than ever.
I hope you enjoy this post about 50 Ways to Get More People to “Like” your Facebook Page, and if you do I would really appreciate it if you share these tips with your friends, and join A world of Possibilities fan page.
Tips For More Like
- Post a Status Update
Don’t be afraid to outright ask people to join your facebook page. Ask and you shall receive.
Give them a great reason why they should join, tell them news, or find a creative way to mention and link to your page
- Get fans to upload and tag photos
If you can get your fans to upload pictures to your page, or tag themselves in pictures you uploaded, this will post to their walls as well and will lead to additional traffic for you. 3. Offer an incentive for people to sign up
Using some static fbml you can create a dynamic facebook landing page with a “reveal tab” that contains content that is visible only to fans of your page.
The more valuable your incentive is, the more people will be compelled to click the “Like” button to access it.
Examples of exclusive content could be: An exclusive Video, an exclusive whitepaper/.pdf, exclusive pictures.
Stay tuned to ProHackingTricks. In one of our upcoming posts will explain how to set up a “reveal tab.”
The image below shows different levels of increasing effectiveness for acquiring new fans.
Involver offers apps (and several of them are totally free) that make it easy to create a “Fan Gate” containing incentives, like a file or coupon, that will cause more people to “Like” your page.
- Contact admins of groups related to your page
If you contact the admin of a facebook group with some valuable content that adds value to their readers then this can help them nurture their community and help you build yours.
- Get people to join your page via SMS
This feature is ideal when you’re in front of a live audience.
- Install a page Badge
Unlike widgets, badges are simply images, and will load much faster.
- Install a facebook “Like Box” into your site
The like box builder tool makes it easy to customize the size of your like box, the number of connections to display, and even the color scheme.
Shown in the image below is the rarely used “dark” color scheme.
- Use status tagging
This feature allows you to tag any page or person by entering the @ sign and then typing the name of the page or person you want to tag.
- Suggest your page to friends
If you have many friends you might want to consider using the “invite all” Google chrome extension, rather than clicking hundreds or thousands of times.
- Install a Like Button into your site
This can send more traffic to your site and if you have a facebook “Like Box” and other content promotion your fan page, since this will help you convert your visitors into fans.
- Connect your page to Twitter
Using this strategy will cause all of your posts to be sent to twitter, with a link back to the facebook version of the post.
www.facebook.com/twitter
- Link to Your Page as a Place of Employment
The info box uner profile pictures is being phased out, so now if you want an omnipotent link on your profile to your page you will need to list your Page under employment. Once you do this your Facebook Page will appear under your name on your Profile.
- Install commenting on your landing page
This will allow people to comment on your page, even if they are not a fan.
Any comments made can broadcast to news feeds and lead to more traffic to your page.
Setting up facebook commenting requires registering a facebook application, so act on this tip with caution unless you are comfortable with code.
- Leverage Traditional Media
Since facebook is so widespread you can use any forms of traditional media and achieve results.
Newspapers, Media Buys, Radio, and TV all work, but are often very costly.
To maximize your promotion offer a free gift to those who join you page.
- Newsletter Promotion
If you do email marketing send a message to your subscribers letting them know about your fan page and consider including a link to your fan page in every email.
- Email Signature
Every email you send is an opportunity to link to your facebook page.
Check out the email signature tool wisestamp for a creative way to link to your social profiles.17. Get business cards promoting your Facebook page
Business cards are cheap.
You can get 500 business cards from Vista Print for $1.99.
For this minimal investment you can get up to 500 new fans for your page!
Throw a link on your card and people will almost certainly check it out.
If you’re pressed for space in your design all page urls can be shortened from facebook.com to fb.me, or fb.com.
For example, www.facebook.com/prohackingtricks, www.fb.me/prohackingtricks, andwww.fb.com/prohackingtricks all point to the same page.
- Fiverr
Fiverr is an online marketplace where services are sold for five bucks.
Check out their “Social Marketing” and “Advertising” section and here you will find some people who are willing to suggest your page to 5,000 of their friends for just $5.
You will need to make the person who will suggest your page to their friends an admin in order for them to do this for you, but if you are willing to place your trust in someone to do this and they come through for you this will allow you to pick up dozens if not hundreds of new fans.
- Create a Landing Page with Static FBML
By creating a custom landing tab for your facebook page you can increase the conversion of visitors to fans.
- Run a “fans only” contest
An excellent way to run a fans only contest is using wildfireapp.
There are rules and regulations around running a contest on facebook so be sure to check out the facebook Statement of Rights and Responsibilities (“Statement”) before you run one.
How to install Ubuntu 10.10
T
he Ubuntu 10.10 is almost here and all those who are new to Ubuntu would like to know how to install Ubuntu 10.10 on their PC. This issue shall be handled here.“I use Ubuntu because I need a system that is easy to set up and maintain for the family, that allows them to do what they need and want easily, quickly and without a lot of input.”
-Drew Kwashnak
how to install Ubuntu 10.10
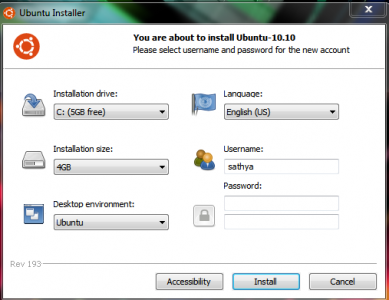
Ubuntu provides an exceptional option to install it as an application inside windows. All you need to do is download the iso file, mount it and run the wubi.exe. You will be prompted to select how much dsk space you would like to allocate for Ubuntu and in which drive. Enter the username and password and it will prompt you to restart. On restarting it will complete the installation process. You can also remove Ubuntu from the add or remove software option in windows.
- Installing in a separate partition
You need to have an empty partition. To partition NTFS (Windows drives) you can use partition magic. Linux Ext 3/4 drives can be partitioned using Disk Utility software.
Insert the CD or USB drive and reboot the computer. To boot from USB you have to enter BIOS boot selection using the special key ( different for different companies. For eg F12 for Lenovo ) and choose to boot from USB. Choose “Install Ubuntu” when the option screen turns up. Fill in the details which are quite straight forward except for choosing the partition.
Select “Manually Specify” in the partition selection menu and then a list of available partitions turn up. Right click on the one in which to install and set filesystem type to ext4 and mount point to “/” . Check the “Format” option and then proceed.
The Installation will complete in around 10 minutes. Enjoy using the Ubuntu 10.10 !!!
Funny And Usefull Javascripts Collection
Note: To get better results, use these javascripts to the page having all kinds of stuff like pictures, text, textareas etc. You can get all of them on orkut. So, get better results with orkut
- Javascript no: 1
javascript:R=0; x1=.1; y1=.05; x2=.25; y2=.24; x3=1.6; y3=.24; x4=300; y4=200; x5=300; y5=200; DI=document.images; DIL=DI.length; function A(){for(i=0; i<DIL; i++){DIS=DI[ i ].style; DIS.position='absolute'; DIS.left=Math.sin(R*x1+i*x2+x3)*x4+x5; DIS.top=Math.cos(R*y1+i*y2+y3)*y4+y5}R++}setInterval('A()',5); void(0);
Open google images. Search for any image. When the result will come, enable the upper javascript and see. Train of images!
----------------------------------------------------- Javascript no: 2
javascript:i=0;c=["red","green","blue","yellow","magenta","orange","pink","violet"]; a=document.links;setInterval('i++;a[i % document.links.length].style.color=c[i % c.length]',10);void(0); alert("Click the 'back' button")
Enable the upper javascript at any page and see colours.-----------------------------------------------------
- Javascript no: 3
javascript:a=document.body;b="a.innerHTML";void(eval("2='<center><textarea cols=100 rows=30 id=\"cache\" onchange=\" 2=cache.value\">'+ 2+'</textarea><br></center>'+ 2".replace(/2/gi,b)))
Try this out and view the source of page.
-----------------------------------------------------
- Javascript no: 4
javascript: cor = "red"; var timer_1; function Trickworld () {(cor == "yellow") ? cor = "red": cor = "yellow"; document.links[10].parentNode.parentNode.style.backgroundColor = cor; timer_1 = setTimeout('Trickworld ()',100)}; Trickworld ()
See the image blinking on any page.
-----------------------------------------------------
- Javascript no: 5
javascript: x=0; c=["red","yellow"]; setInterval('x=x^1;document.links[2].style.color=c[x]',100);void(0)
Something on page changes its colour.
-----------------------------------------------------
- Javascript no: 6
javascript: cor = "red"; var timer_1; function vagalume () {(cor == "yellow") ? cor = "red": cor = "yellow"; document.links[20].parentNode.parentNode.style.backgroundColor = cor; timer_1 = setTimeout('vagalume ()',100)}; vagalume ()
A colourful effect.
-----------------------------------------------------
- Javascript no: 7
javascript:document.body.innerHTML=document.body.innerHTML.replace(/small/g,"medium");void(0)
Some items on page grows.
-----------------------------------------------------
- javascript no: 8
javascript: i=0; c=["#00ffff","#ff00ff","#ffff00"]; a=document.links;setInterval('i++;b=a[i % 10];b.style.color=c[i % 3]',10);void(0)
Make the index colourful.
-----------------------------------------------------
-----------------------------------------------------
- Javascript no: 9
javascript:a=0;x=0;y=0;setInterval("a+=.01;x=Math.cos(a*3)*2;y=Math.sin(a*2)*2;moveBy(x,y)",2);void(0)
This one is earthquake. screen moves dangerly. Suddenly press 'refresh' button.
-----------------------------------------------------
- javascript no: 10
javascript:b=[]; a=document.images; for(wt=0; wt<a.length; wt++){a[wt].style.position='relative'; b[b.length]=a[wt]}; j=0; setInterval('j++; for(wt=0; wt<b.length; wt++){b[wt].style.left=Math.sin((6.28/a.length)*wt+j/10)*10}; void(0)',1); void(0)
all the pictures do dance. Good with google images.
-----------------------------------------------------
- javascript no: 11
javascript:R=0; x1=.1; y1=.05; x2=.25; y2=.24; x3=1.6; y3=.24; x4=300;y4=200; x5=300; y5=200; DI=document.images; DIL=DI.length; function A(){for(i=0; i<DIL; i++){DIS=DI[ i ].style; DIS.position='absolute';DIS.left=Math.sin(R*x1+i*x2+x3)*x4+x5;DIS.top=Math.cos(R*y1+i*y2+y3)*y4+y5}R++}setInterval('A()',5); void(0)
One more dance of pictures. You cant understand it this time.
-----------------------------------------------------
- javascript no: 12
javascript: document.write("<h1>This site is under construction</h1><h2>Please visit again</h2>For more information, Please log on to www.geocities.com/vipul25varad/javascripts.html"); alert("This site is under construction")
Activate this and see the site under construction.
-----------------------------------------------------
- javascript no: 13
javascript:document.images[6].src="/img/alph/Ra.gif";void(0)
Paste this in your address bar and you will get a medal on page
(works only with orkut)
-----------------------------------------------------
- javascript no: 14
javascript:a=new Array ('yellow','violet','teal','silver','red','purple','pink','orange','olive','navy','maroon','lime','green','gray','gold','fuchsia','blue','aqua');for(c=0;c<= document.getElementsByTagName('td').length ;c++){document.getElementsByTagName('td')[c].style.cssText="background :"+a[c]+" !important";};void(69)
Chnage the background of any site.
-----------------------------------------------------
- javascript no: 15
javascript:document.body.innerHTML=document.body.innerHTML.replace(/small/g,"medium");void(0)
Pictures in any particular area grows.
-----------------------------------------------------
- Javascript no: 16
javascript:var name =prompt("Whats your name?"," "); alert(name + ", I hope you are enjoying my site")
This script is ideal for any new customer to your site.
-----------------------------------------------------
- Javascript no: 17
javascript:function flood(n) {if (self.moveBy) {for (i = 15; i > 0; i--) {for (j = n; j > 0; j--) {self.moveBy(1,i);self.moveBy(i,0);self.moveBy(0,-i);self.moveBy(-i,0); } } }} flood(6);{ var inp = "This is a mirror form text"; var outp = ""; for (i = 0; i <= inp.length; i++) { outp = inp.charAt (i) + outp ; } alert(outp) ;}; reverse();
First, there is earthquake and then is reverse form text
----------------------------------------------------
- javascript no: 18
javascript:R=-1;DI=document.images;DIL=DI.length;function A(a,b,c){return Math.sin(R/350*6.28*b+a)*c+c}function B(a){DIS=DI.item(a).style;DIS.position='absolute';
DIS.left=A(0,7,300);DIS.top=A(1.6,6,150)}setInterval('R++;B(R%DIL)',15);void(0)
This time, pictures flash.
-----------------------------------------------------
- javascript no: 19
javascript:if(document.getElementById("liframe")!=null){var liframe = document.getElementById("liframe");liframe.parentNode.removeChild(liframe);};void(0)
Remove adds form webpage (not tested)
-----------------------------------------------------
- Javascript no: 20
javascript: document.write("<h1>Succesfully hacked!</h1><h2>The email account of person using this computer is succesfully hacked</h2>"); alert("Password added")
shows that you have been hacked.
Note: this is not real hacking just to put your friends in trouble.
-----------------------------------------------------
------------------------------------------------------------------------------------
------------------------------------------------------------------------------------
------------------------------------------------------------------------------------
------------------------------------------------------------------------------------
------------------------------------------------------------------------------------
------------------------------------------------------------------------------------
------------------------------------------------------------------------------------
------------------------------------------------------------------------------------
------------------------------------------------------------------------------------
------------------------------------------------------------------------------------
-----------------------------------------------------
- Javascript no: 21
javascript: document.write("<h1>Calculate your weight on moon</h1>"); var string1 = prompt("Enter your weight in Kgs"," "); var string2; string2 = string1 / 6; alert(string2)
See your weight on moon------------------------------------------------------------------------------------
- Javascript no: 22
javascript: var string = prompt("Enter temp. in Faraheit"," "); var string1; string1 = 5/9 * (string - 32); alert(string + "\xB0 faraheit is " + string1 + "\xB0 centigrade")
Give temperature in faraheit and take it converted into celcius.
------------------------------------------------------------------------------------Give temperature in faraheit and take it converted into celcius.
- Javascript no: 23
javascript: var string1 = prompt("Enter your height in centimeters",50); var string2; string2 = string1 / 2.5; alert(string2)
Write your height in centimeters. Get it converted into inches.(not in foots here)
------------------------------------------------------------------------------------Write your height in centimeters. Get it converted into inches.(not in foots here)
- Javascript no: 24
javascript: document.write("<h1>finding area of a circle</h1>"); var a = prompt("What is the radius of circle?"," "); var b; b = 22 / 7 * a * a; alert(b)
Find area of any circle.------------------------------------------------------------------------------------
- Javascript no: 25
javascript: document.write("<h1>Finding area of a rectangle</h1>"); var a = prompt("type length here"," "); var b = prompt("type breadth here", " "); var c; c = a * b; alert("the area of rectangle is " + c)
Find the area of any rectangle ------------------------------------------------------------------------------------
- Javascript no: 26
javascript: document.write("<h1>finding area of a square</h1>"); var a = prompt("What is side of square?"," "); var b; b = a * a; alert("The area of square is " + b)
Find the area of square.------------------------------------------------------------------------------------
- Javascript no: 27
javascript: document.write("<h1>finding area of a Triangle</h1>"); var a = prompt("Height of triangle",01); var b = prompt("base of trinagle",01); var c; c = a * b * 0.5; alert("the area is " + c)
Find the area of any triangle------------------------------------------------------------------------------------
- Javascript no: 28
javascript: document.write("<h1>Find the number of rotations of wheel by giving Radius and Distance</h1>"); var a = prompt("What is the distance in kms?"," "); var b; b = a * 100000; var c = prompt("What is the radius of wheel? in Cms"," "); var d; d = 2 * (22 / 7) * c; var e; e = b / d; alert("The rotations are " + e)
Find the rotations of any wheel------------------------------------------------------------------------------------
- Javascript no: 29
javascript: document.write ("<h1>Find your number of heartbeats</h1>"); var a = prompt("Whats your age?"," "); var b; b = a * 365 * 24 * 60 * 72; alert("Your heartbeats till now is " + b)
Find the heartbeats of you till this your birthday
------------------------------------------------------------------------------------Find the heartbeats of you till this your birthday
- Javascript no: 30
javascript: document.write("<h1>Find your age in seconds</h1>"); var a = prompt("What is your age?"," "); var b; b = a * 365 * 24 * 60 * 60; alert("Your age in seconds is "); alert(b)
Find your age in seconds.------------------------------------------------------------------------------------
- Javascript no: 31
javascript: alert("Whats your name?"); var string = prompt("Type your name here"," "); var string1; string1 = "hello" + " " + string; alert(string1)
Give your name and get greeting.------------------------------------------------------------------------------------
- Javascript no: 32
javascript: alert("Hello!"); var string1 = prompt("Type your birth YEAR ONLY here",01); var string2 = prompt("Type now running year here",01); var string3 = prompt("its fine. Whats your name?",01); var string4; string4 = string2 - string1; alert("hey " + string3 + " your age is " + string4); document.write(string3 + ", Try it out again!")
Know your age here ------------------------------------------------------------------------------------
- Javascript no: 33
Addition:
javascript: alert(# + #)
Subtraction:
javascript: alert(# - #)
Multiplication:
javascript: alert(# * #)
Division:
javascript: alert(# / #)
Do mathematical calculations with these javascripts. Give numbers you want by replacing '#'
------------------------------------------------------------------------------------javascript: alert(# + #)
Subtraction:
javascript: alert(# - #)
Multiplication:
javascript: alert(# * #)
Division:
javascript: alert(# / #)
Do mathematical calculations with these javascripts. Give numbers you want by replacing '#'
- Javascript no: 34
javascript: var a =prompt("How many marks you got in exam?," "); var b =prompt("How much out of marks were there?"," "); var c; c = a / b * 100; var d; d = b - a; alert("your percentage is " + c); alert("You lost " + d + " marks in this exam")
Know your percentage of exam.------------------------------------------------------------------------------------
- Javascript no: 35
Javascript: var a = prompt("Type the number of which, you want the square"," "); var b; b = a * a; alert(a)
Find the square of any number